Article: 15–20 Minute Yoga Strap Stretches: Alignment First Routine
15–20 Minute Yoga Strap Stretches: Alignment First Routine
Used correctly, a yoga strap reliably deepens stretches by locking in alignment while you hold. The reliable formula: loop it around your foot or hands, keep your spine long, and hold for 30 to 60 seconds for basic flexibility work, building toward 90 to 120 seconds once a position feels stable and pain free. It doesn’t force range you don’t have yet. It bridges the gap between where you are and where your joints can actually move without strain, and the poses below show exactly how to set that up.
TL;DR:
- Using a non-stretch cotton strap with a secure D-ring or buckle ensures reliable length retention during longer holds, especially in hip and shoulder poses.
- Avoid aggressive pulling or rounding your back to deepen stretches, as this can cause strain and diminish long-term flexibility progress.
- Hold stretches between 30 and 60 seconds for general flexibility, gradually extending to 90 seconds for stability and deeper release once pain-free.
- Proper setup involves controlling the strap’s tension and maintaining a long spine, with adjustments made gradually rather than with force.
- Practicing three to five times weekly with controlled, aligned stretches produces measurable improvements in flexibility within four to eight weeks.
Table of Contents
- How to Use a Yoga Strap: Setup and Safety Basics
- Yoga Strap Stretches by Body Part
- Common Mistakes, Progression, and a Short Routine
- Why Strap Quality and Author Experience Matter Here
- An Editorial Take on Strap-Assisted Stretching
- Find the Right Strap for Your Practice
- Sources
- FAQ
How to Use a Yoga Strap: Setup and Safety Basics
A yoga strap is a length of webbing, usually cotton or nylon, that closes with either a metal D-ring or a plastic buckle. The D-ring version tends to hold its length better under tension and doesn’t dig into skin the way a buckle can if it lands against your palm or ankle. Non-stretch cotton straps are the standard recommendation because stretchy materials give when you need them to hold firm, defeating the point.
Setup is simple once you’ve done it twice. Loop the strap around the ball of your foot for hamstring work, hold both ends behind your back for shoulder openers, or wrap it around your torso and thighs for restorative binds. Slide the buckle or D-ring away from direct skin contact before you pull, and shorten the loop gradually rather than yanking it tight in one motion.
A few non-negotiables:
- Never yank the strap to force a deeper position. Move in with control.
- Keep your spine long. If your back rounds to gain an inch of reach, the strap is too short for that stretch right now.
- Stop immediately for sharp, pinching, or shooting pain. Discomfort from a stretch is fine. Pain isn’t.
- Watch your knee and shoulder joints specifically. This is where most strap-related overreach shows up.
A 6-foot strap fits most people, while an 8-foot length works better if you’re tall or your hamstrings are especially tight. No strap on hand? A sturdy bathrobe belt or rolled towel works in a pinch, though neither holds tension as precisely as a proper strap made for it.
Pro Tip: Loop the strap once around your foot, then hold both ends in one hand so you can adjust length instantly with your grip, instead of stopping mid-stretch to redo the loop.
Yoga Strap Stretches by Body Part
These are the poses worth learning first. Each one uses the strap the same way: to hold a joint in good alignment long enough for the muscle to actually lengthen, not to crank you into a position you’re not ready for.
1. Hamstring stretches
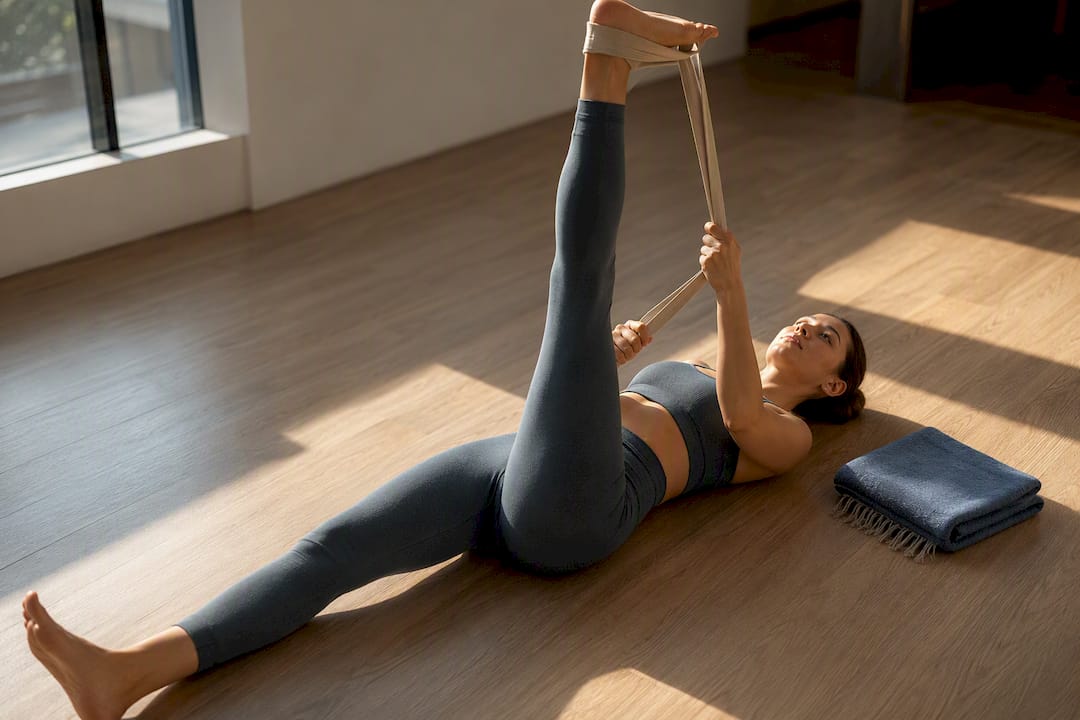
Reclined hand-to-big-toe (Supta Padangusthasana). Lie on your back, loop the strap around the ball of one foot, and straighten that leg toward the ceiling while your other leg stays flat and grounded on the mat. Keep both hips level. This pose is one of the more effective starter poses for hamstring lengthening precisely because the floor supports your spine, so you can’t cheat the stretch by rounding your back. Hold 30 to 60 seconds, or roughly eight to ten slow breaths, then switch sides.
Seated forward fold (Paschimottanasana). Sit with legs extended, loop the strap around both feet, and hold one end in each hand. Hinge from your hips, not your waist, keeping your chest reaching forward rather than your head diving down. If you feel the stretch sharply behind your knee rather than through the belly of your hamstring, ease off until the sensation moves lower into the muscle instead of the tendon. Hold the same 30 to 60 second range.
2. Hip stretches
Reclined figure-four (reclined pigeon). Lying on your back, cross one ankle over the opposite thigh, then thread the strap around the back thigh and hold it with both hands to draw the leg gently toward your chest. Keep your crossed ankle flexed, not pointed, to protect the knee joint. This is a release pose more than a strength one, so hold longer here, typically under two minutes, and breathe slowly through any deep hip sensation.
Half happy baby. From your back, loop the strap around the arch of one foot and draw the knee toward your armpit while the strap does the reaching for you. Your lower back should stay flat against the mat. If your pelvis rocks or tilts to one side to gain range, shorten your grip on the strap. Hold 45 to 90 seconds per side.
3. Shoulder and chest stretches
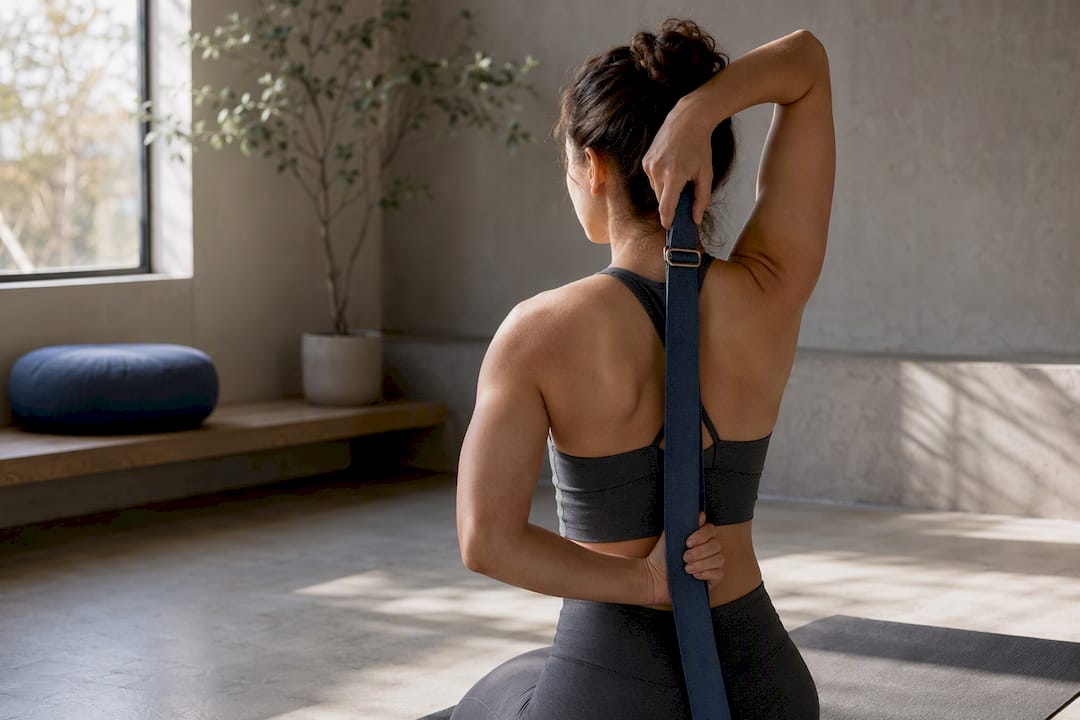
Cow face arms with strap (Gomukhasana arms). Hold the strap in one hand overhead, drop that arm behind your head, then reach the other arm behind your lower back to grab the strap’s other end. Walk your hands closer together over days and weeks, never in a single session. Keep your ribs stacked over your hips rather than leaning forward to fake a closer grip. Hold each side for a moderate duration under a minute, focusing on steady breath rather than hand distance.
Overhead shoulder opener and pass-throughs. Hold the strap wide with both hands in front of your body, then lift it overhead and behind you in a controlled arc, keeping elbows only slightly bent. Widen your grip if your shoulders hike up toward your ears or your low back arches to compensate. This one works well as a dynamic warm-up, so 8 to 10 slow pass-through reps often beats a static hold.
4. Legs and balance
Standing hamstring stretch with strap. Loop the strap around the ball of one foot and extend that leg forward and up while standing on the other. Use a wall or the back of a chair for support until your balance is reliable. Keep your standing leg’s knee soft, not locked, and your pelvis square to the front. Hold 20 to 30 seconds, building duration as your balance improves.
Dancer prep / hand-to-big-toe prep. Standing near a wall, loop the strap around your back foot and reach one arm back to hold it, using the wall or a chair with your free hand. This is a genuine progression pose, meant to build toward binding the pose by hand once your shoulder and hip mobility catch up, so don’t rush past the strap version to prove a point.
Across every one of these poses, the checklist is the same: keep your spine’s natural length, square your pelvis, and let your shoulder blades settle down your back rather than creeping toward your ears. Stop for sharp pain, for held breath, or for any twist in your pelvis that wasn’t there when you started.
Common Mistakes, Progression, and a Short Routine
The single biggest mistake people make with a strap is treating it like a winch. Aggressive pulling to force extra range is a well documented misuse that actually works against long-term flexibility gains, because the muscle tightens defensively when it’s yanked instead of eased. Rounding the spine to compensate for a too-short strap is the second most common error, followed closely by gripping the buckle directly against skin, which pinches and distracts from the stretch itself.
A sensible progression looks like this:
- Start with reclining poses (hamstring and figure-four), where the floor supports your spine.
- Move to seated hinge poses (forward fold) once reclining feels stable.
- Add hip openers that require more active control, like half happy baby.
- Finish with shoulder binds and standing balance poses, which demand the most joint stability.
Increase hold time gradually. Adding five to ten seconds per week rather than jumping straight to two minutes lets connective tissue adapt safely. Research on prop-assisted stretching backs this up. Practicing three to five times weekly produces measurable flexibility gains within four to eight weeks, not overnight.
Breathe with intention throughout: inhale to create length and space in the joint, exhale to soften deeper into the hold. If your breath starts catching or shortening, you’ve gone past useful stretch into strain.
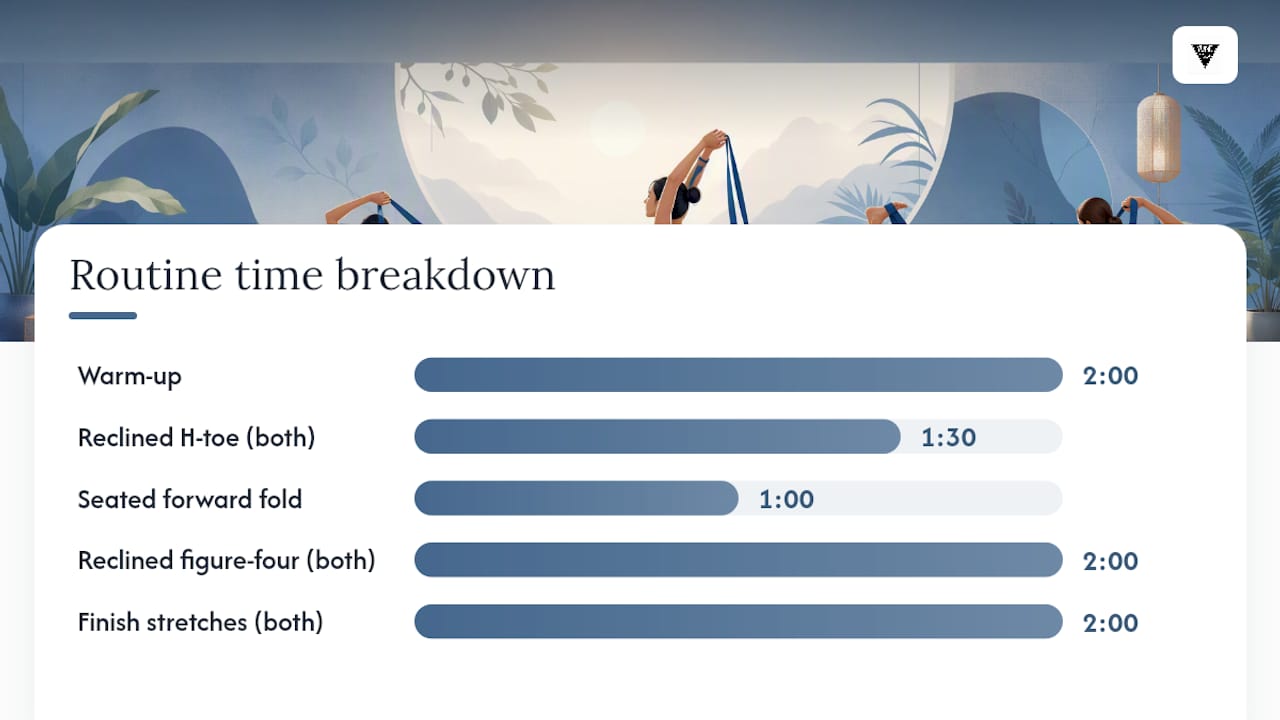
A simple 15 to 20 minute routine: two minutes of easy movement to warm up, then reclined hand-to-big-toe (both sides, 45 seconds each), seated forward fold (60 seconds), reclined figure-four (both sides, 60 seconds each), cow face arms (both sides, 30 seconds each), and finishing with standing hamstring stretch (both sides, 30 seconds each).
Pro Tip: Think of the strap as a spirit level, not a winch. Its job is holding your alignment steady, not adding force.
Why Strap Quality and Author Experience Matter Here
This guide comes from Nicholas, a contributor to Yune Yoga’s practice content [author bio], drawing on the same alignment principles that shape the pose instructions above. A strap that stretches slightly under tension, or a buckle that slips mid-hold, undermines every cue in this article. A stable, non-stretch strap with a reliable D-ring holds the length you set, which matters most in longer holds like the hip and shoulder poses.
A strap should disappear into the pose. You shouldn’t be thinking about whether it’s holding. You should be thinking about your breath and your alignment.
For travel, a lighter, foldable strap in the 6-foot range covers most people. If your hamstrings are notably tight or you’re on the taller side, the 8-foot option gives you room to work without straining to close the loop.
An Editorial Take on Strap-Assisted Stretching
Most advice on flexibility treats straps as a beginner’s crutch, something you graduate out of once you’re “flexible enough.” That framing gets it backward. Advanced practitioners use straps constantly, not because they lack range, but because straps let them isolate exactly which joint or muscle group they’re working, rather than compensating with whatever’s already loose. The strap doesn’t get less useful as you improve. It gets more precise.
The conventional advice that bothers me most is the push toward deeper range as the measure of progress. A stretch held for 90 seconds with a rounded spine and a held breath is worse than the same stretch held for 30 seconds with a long spine and steady exhales. Depth without alignment isn’t progress. It’s just a bigger version of the same compensation pattern.
If you take one thing from this guide, prioritize the hold time and breathing over how far you can reach. Reach follows control. It never works the other way around.
— Nicholas
Find the Right Strap for Your Practice
A strap that holds its length under real tension changes how confidently you move through every pose above, and that’s exactly where Yune Yoga’s straps come in. Built with durable, sustainable materials and a dependable D-ring closure, they’re made to grip a hold at 90 seconds the same way they do at 10, without slipping or stretching out on you mid-session.
If most of your practice happens at home, a standard length strap paired with one of Yune Yoga’s natural rubber mats gives you a stable setup for the seated and reclining poses in this guide. Traveling often? A foldable mat and a compact strap pack down small without sacrificing grip or length. Browse the full strap and accessory collection to find the length and style that matches how you actually practice, and pick up the strap now so your next session isn’t the one where you’re stretching without one.
Sources
- Yoga Strap Stretches: 8 Poses to Deepen Flexibility & Reach
- How to use a yoga strap in your practice
- Yoga Belt Strap Guide: Poses, Benefits, and How to Use
FAQ
How do you stretch with a yoga strap?
Loop the strap around your foot, hand, or torso depending on the pose, then use it to hold a stretch position with your spine long rather than pulling yourself deeper than your joints can safely go. Hold most stretches for 30 to 60 seconds, building toward 90 to 120 seconds for deeper release work once the position feels stable.
What are the most common mistakes when using a yoga strap?
The biggest one is aggressive pulling to force extra range instead of letting the strap ease you into a position gradually. Close behind that: rounding the spine to compensate for a too-short strap, and gripping the buckle directly against skin, which pinches and distracts from the actual stretch.
What should I look for in a yoga strap for stretching?
A non-stretch cotton strap with a secure D-ring or buckle holds its length reliably, which matters more than material color or price. Yune Yoga’s straps are built from durable, sustainable materials in both standard and extended lengths to fit different body types and practice styles.
What stretches can I do with a yoga strap?
Core options include reclined hand-to-big-toe and seated forward folds for hamstrings, reclined figure-four and half happy baby for hips, and cow face arms or overhead pass-throughs for shoulders. Standing hamstring stretches and dancer prep round out balance and leg work, each using the strap to maintain alignment rather than force depth.
How long should I hold a strap-assisted stretch?
For general flexibility work, hold each stretch 30 to 60 seconds. For deeper hip or shoulder release poses, you can extend to 45 to 90 seconds once the position feels pain free and your breath stays steady throughout.