Article: Crane Pose Guide: Build Strength and Stability for Bakasana
Crane Pose Guide: Build Strength and Stability for Bakasana
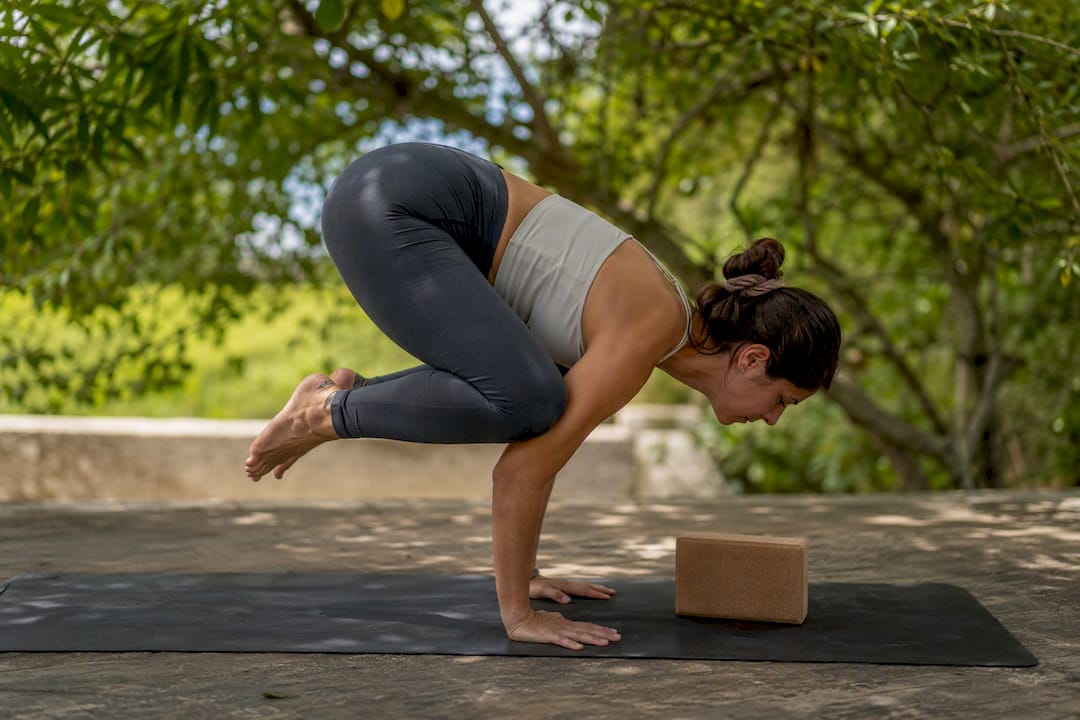
Crane Pose, or Bakasana, is a compact arm balance where you plant your hands, hook your knees onto the backs of your upper arms, and lift your feet off the floor while your body compresses into a rounded, forward-leaning shape. Three cues make or break it: load your fingertips as much as your palms so your weight tips forward, engage mula bandha (a pelvic floor lift) to compress your core and lighten your legs, and keep your gaze slightly ahead of your hands instead of down. One caveat before you try it: if you have any wrist, elbow, or shoulder pain, or you’re recovering from surgery in those joints, skip full weight bearing until a doctor clears you.
- Hand placement: fingers spread wide, weight shifted into the fingertips, not just the palms.
- Core engagement: lift mula bandha and draw your lower belly in to compress your body into a ball.
- Gaze: look slightly forward, not straight down, to keep your center of gravity from collapsing backward.
Key Takeaways
Crane Pose comes down to shifting your weight into your fingertips while compressing your core, not brute arm strength.
| Point | Details |
|---|---|
| Core compression drives the lift | Engage mula bandha and your transverse abdominis before shifting weight forward, not after. |
| Crow and Crane differ by elbow angle | Bent elbows (Crow) reduce shoulder load; straighter arms (Crane) increase wrist extension demand. |
| Knee placement changes everything | Position knees high on your upper arms, close to the armpits, for better leverage. |
| Props remove fear, not skill | A block in front of your hands lets you practice the forward tip without risking a fall. |
| Progress takes four to eight weeks | Three sessions weekly with targeted drills builds a stable lift faster than repeated full attempts. |
| Yuneyoga supports the practice | Non-slip mats and support blocks from Yuneyoga help you hold hand position and cushion early lift attempts. |
Table of Contents
- How to Do Crane Pose Step by Step
- What Muscles Does Crane Pose Train?
- What Drills Build Strength for Crane Pose?
- Crow Pose vs. Crane Pose: What’s the Difference?
- How Do You Use Props for Crane Pose?
- Why Does My Crane Pose Keep Falling Forward?
- How Long Does It Take to Learn Crane Pose?
- Frequently Asked Questions
- Sources
How to Do Crane Pose Step by Step
Getting into Bakasana is less about a single explosive effort and more about a controlled weight shift you can slow down, pause, and repeat. The most reliable path starts from a squat, not a jump.
- Start in Malasana, a low squat with your feet slightly wider than hip-width and your heels down or lifted on a folded mat if they don’t reach the floor.
- Plant your hands shoulder-width apart, fingers spread wide, about a foot in front of your feet.
- Bend your elbows slightly and press your inner knees or upper shins against the backs of your upper arms, as high up toward your armpits as you can get them.
- Shift your weight forward slowly, letting your shoulders move past your wrists, until you feel your toes get light.
- Squeeze your knees into your arms and lift one foot, then the other, or both together if your core compression is strong enough. This entry sequence, moving from a squat with hands planted shoulder-width apart before walking or shifting the weight forward, mirrors the common cues taught across most Bakasana tutorials.
- Hold, keeping your gaze forward and your breath steady rather than held.
A few alignment checkpoints matter more than people expect. Your elbows should track back toward your ribs rather than splaying out to the sides, which keeps the pose stacked over your wrists instead of twisting them. Your knees should rest high on your upper arms, close to your armpits, not down near your elbows where you’ll lose leverage. Keep your shoulders actively pressing away from your ears (protracted, not shrugged) so your upper back, not just your arms, is doing the holding.
- Fingers spread, weight in the fingertips.
- Elbows hugging in, not winging out.
- Knees high on the upper arms, close to the armpit crease.
- Hips lifted, not sagging toward the floor.
- Shoulders pressing down and slightly forward.
- Gaze forward, breath unhurried.
Coming down is just as important as going up. The simplest exit is to reverse the entry: bend your elbows, lower your feet back to the floor, and return to Malasana with control. If you feel yourself tipping forward past your balance point, a forward roll onto your upper back (chin tucked) is a safe bailout that trained gymnasts and yogis use constantly. Stepping one foot down at a time also works if you catch the loss of balance early.
Pro Tip: Place a low block just in front of your hands before you attempt the lift. If you tip forward, your forehead or feet land softly instead of hitting the mat, which removes most of the fear response and lets you focus on the actual mechanics.
What Muscles Does Crane Pose Train?
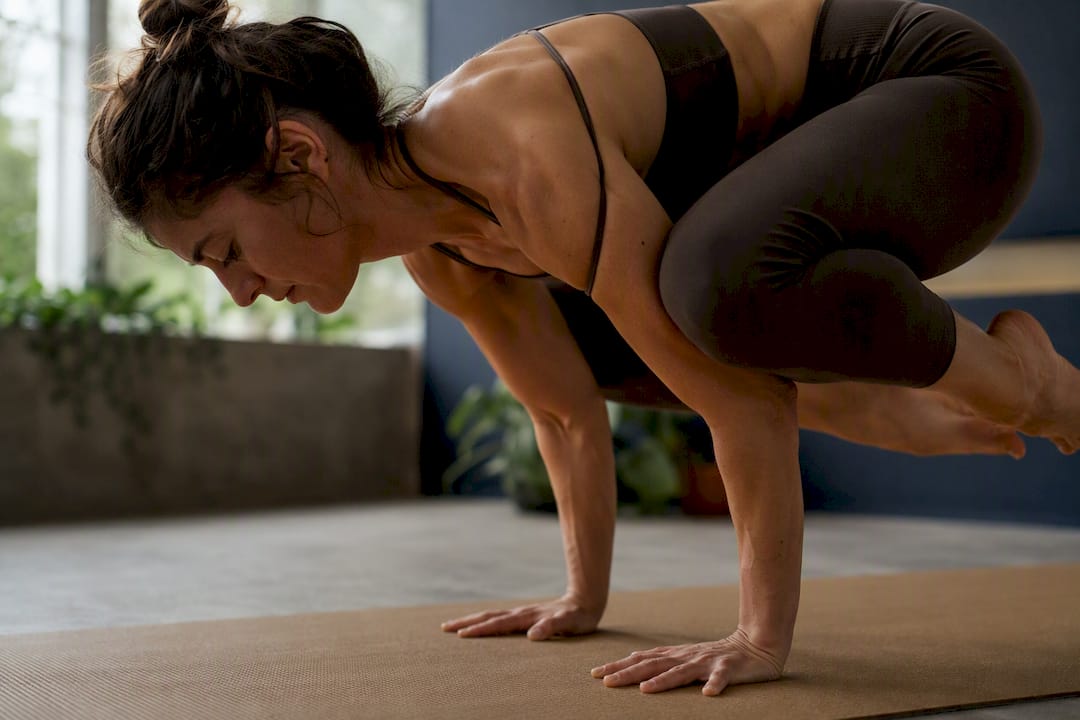
Bakasana is fundamentally a compression exercise, not a pushing exercise. Your body needs to fold and shorten rather than extend, which is a different demand than most strength training targets.
The primary movers are your transverse abdominis and rectus abdominis, which pull your ribs toward your pelvis, along with your obliques, which help stabilize the twist-resistant compression through your midline. Your hip flexors draw your knees up and in, while your serratus anterior and anterior deltoids stabilize your shoulder blades against your ribcage so your upper body doesn’t collapse. Your forearm flexors and extensors control the fine-tuning at your wrist joint, which is under significant load in this pose. According to research on Bakasana’s anatomical demands, this combination of transverse abdominis, obliques, rectus abdominis, hip flexors, and serratus anterior activation is what allows the compression and shoulder stability the pose requires.
- Transverse abdominis and rectus abdominis: core compression.
- Obliques: rotational stability.
- Hip flexors: knee lift and hug.
- Serratus anterior and anterior deltoids: scapular stability.
- Forearm muscles: wrist control under load.
Mula bandha, the subtle lift of your pelvic floor, isn’t decoration. It works with your transverse abdominis to create the internal pressure that makes your lower body feel lighter and more controllable. If you attempt the straight-arm variation of Bakasana, your wrists move into a deeper extension angle, which increases the load through your forearm flexors considerably. That’s worth knowing before you chase the “advanced” straight-arm look before your wrists are ready for it. Off the mat, prioritizing targeted ab work and wrist mobility drills will do more for your Bakasana than repeated failed attempts.
What Drills Build Strength for Crane Pose?
You don’t need to attempt full lifts every session to make progress. Isolating the individual components, wrist tolerance, core compression, and shoulder endurance, builds the foundation faster than repeated all-or-nothing tries.
- Tucked-leg lifts on a block. Sit your hips on a low block in Malasana, plant your hands, and practice just lifting your toes an inch off the floor. This teaches the weight shift without the height.
- Knees-on-arm holds. From a squat, press your knees into your upper arms and simply hold that contact point for 20 to 30 seconds without lifting anything, building the muscle memory for where your legs belong.
- Supported Bakasana on a block. Elevate your hips slightly with a block underneath to shorten the lever arm while you practice the full shape.
- Crow holds (bent-elbow version) for 15 to 20 seconds, three to five rounds, to build baseline compression strength before moving to straighter arms.
- Plank to Chaturanga repetitions, 5 to 8 slow reps, for shoulder and triceps endurance.
Pair those with preparatory poses that build the surrounding mobility. Malasana opens your hips and ankles. Downward-Facing Dog builds shoulder and wrist tolerance under load. Virasana (Hero Pose) counters the deep hip flexion with extension, keeping your hips balanced. Seated core drills, like slow leg lifts or hollow-body holds, train the transverse abdominis specifically. Moving through plank to low plank transitions and Downward Dog regularly is one of the more direct ways to build the arm and shoulder endurance Bakasana demands.
- Warm your wrists with circles and gentle extension stretches before every attempt.
- Cap wrist-loaded drills at 2 to 3 sets initially and increase gradually over weeks, not days.
- Regress to fists or forearms on a mat if your wrists complain during any drill.
Crow Pose vs. Crane Pose: What’s the Difference?
The names get used interchangeably in most studios, but there’s a real technical distinction. Traditionally, Kakasana (Crow) is practiced with bent elbows, keeping your body closer to the ground and reducing the load on your shoulders and core. Bakasana (Crane), in its classical form, uses straighter arms, which raises your hips higher and shifts more of the holding work onto your shoulder stabilizers and less onto your triceps. This distinction, straight arms for Bakasana versus bent arms for Kakasana, comes directly from how the two poses are classically defined, even though modern classes often blend the two under a single name.
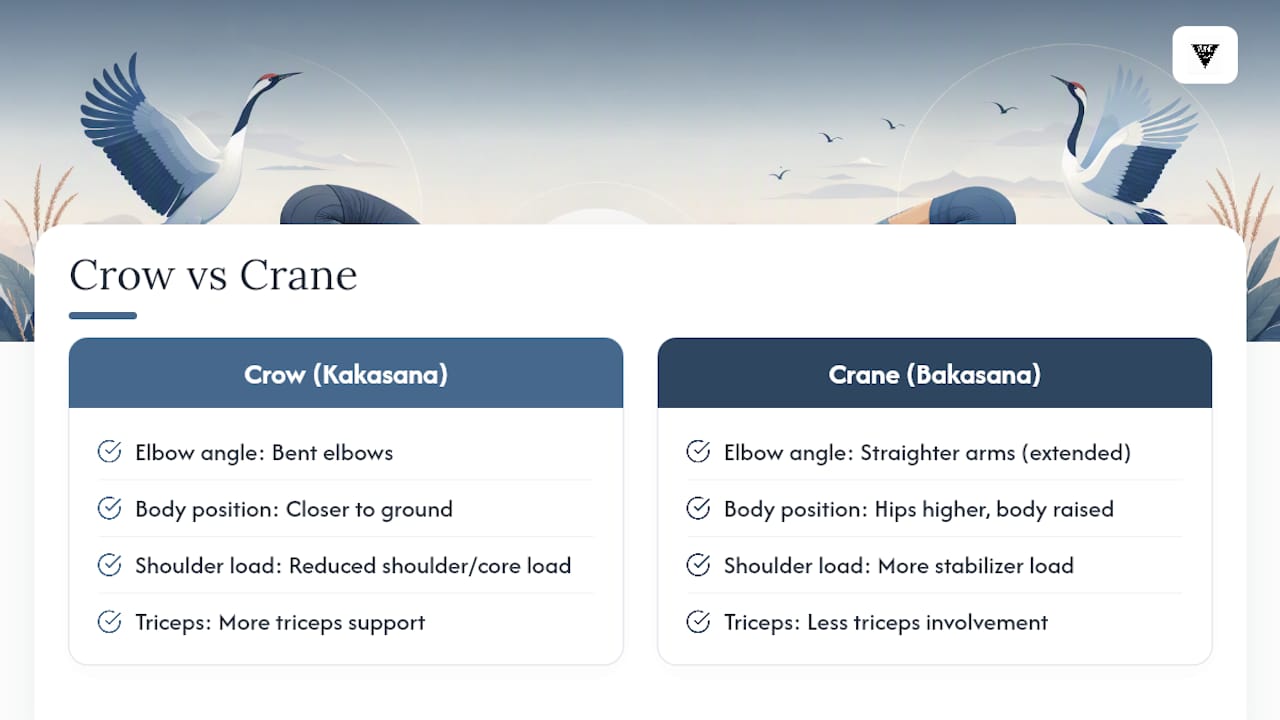
That elbow angle changes more than aesthetics. Straighter arms increase wrist extension demand and require more scapular strength to prevent your chest from dropping. Bent arms distribute load differently and are usually the easier entry point for most people building their first lift.
For beginners, sensible modifications include keeping your knees on your triceps rather than reaching for your armpits, placing a block under your feet to shorten the distance to the floor, and practicing partial lifts where only your toes leave the ground. Once you have a stable, breath-steady hold, intermediate progressions worth exploring include straight-arm Bakasana (the classical Crane shape with elbows extended), Eka Pada Bakasana (One-Legged Crane), and Parshva Bakasana (Side Crane), which involve different challenges for hip, core, and oblique strength.
These named variations change your center of gravity in distinct ways, so master a stable two-legged lift before layering on rotation or single-leg work. From there, the natural next step for many practitioners is exploring handstand prep or Bird of Paradise Pose, both of which build on the same balance and compression skills Bakasana teaches. You’ll know you’re ready to progress when you can hold Crane for five full breaths without your legs sliding down your arms.
How Do You Use Props for Crane Pose?
Props aren’t a crutch here. They’re the fastest way to isolate the skill you’re missing without risking a face-plant every time you try.
A block placed under your toes raises the floor closer to you, shortening the distance your feet need to lift and making the compression easier to find. A block placed just in front of your hands gives you something soft to fall onto if you tip forward, which does more for your confidence than any verbal cue. Practicing near a wall, with your back or hip lightly grazing it, prevents the backward tip that some beginners fear more than the forward one. A chair positioned in front of you lets a partner or teacher offer light support at your hips during your first few attempts. Using a low block as a landing zone is a documented technique for reducing the fear response that keeps many capable practitioners from ever attempting the forward shift required to lift off.
- Block under toes: shortens the lift, builds early confidence.
- Block in front of hands: soft landing zone for forward tips.
- Wall practice: removes fear of falling backward.
- Chair spotting: hands-on support during first attempts.
- Strap around the upper arms: reinforces the hug needed for knee compression.
Wrist protection deserves its own attention. Fold your mat once or twice under your palms to create a slight wedge, which reduces the extension angle at your wrist joint. Keep your fingers spread and your weight distributed across your whole hand, not concentrated in your wrist crease. If you feel any sharp or pinching sensation, that’s your body’s cue to come down immediately, not push through.
Why Does My Crane Pose Keep Falling Forward?
Most failed lifts trace back to one of three root causes, and each has a specific fix rather than a vague “try harder.”
- Looking down at the floor. Fix: keep your gaze slightly forward and your chin level, since your head position drags your whole balance point with it.
- Knees slipping down toward your elbows. Fix: reposition your knees higher, closer to your armpits, and add a block under your hips for the first few reps to reduce the lever length.
- Weak midline compression. Fix: pause before lifting and actively engage mula bandha and your lower abdominals for two full breaths before attempting the shift.
- Elbows splaying outward. Fix: actively hug your elbows in toward your ribs before you even shift your weight forward.
- Weight staying in the heels of your hands instead of your fingertips. Fix: spread your fingers wide and consciously press through your fingertips as you lean forward.
A quick corrective drill: hold Plank for 20 seconds focusing only on scapular protraction (pushing the floor away), then move directly into a squat and attempt Bakasana. This resets your shoulder engagement right before the lift. If you ever feel sharp joint pain rather than muscular fatigue, stop the attempt entirely. Muscle fatigue burns and builds over the hold; joint pain is sharp, localized, and a signal to see a teacher or medical professional rather than push through, particularly if you have a history of wrist or shoulder injury. Reviewing your alignment fundamentals periodically helps catch these habits before they become ingrained.
How Long Does It Take to Learn Crane Pose?
Three sessions a week, each including 15 to 20 minutes of targeted drill work, is a realistic cadence for most practitioners building toward a stable Bakasana. Because Crane is classified as an intermediate arm balance, expect the timeline to run several weeks rather than a single practice session, depending on your existing core and shoulder strength.
- Weeks 1 to 2: Focus on wrist warm-ups, plank holds, and knees-on-arm holds. No full lift attempts yet, just building the contact points.
- Weeks 3 to 4: Add supported Bakasana on a block and short toe-lift attempts, 3 to 5 tries per session with full rest between.
- Weeks 5 to 6: Attempt full lifts without the block, aiming for 5 to 8 breath holds, and start journaling which cue (gaze, knee height, core engagement) made the biggest difference each session.
A typical session should open with a general warm-up, move into the targeted drills above, then finish with three to five focused lift attempts rather than dozens of exhausted tries. Mixing in balance-focused sequences on your off days accelerates the neuromuscular side of this skill. You’ll know it’s working when your lifts become consistent rather than lucky, your holds stretch past five breaths, and the fear of falling starts to fade into simple concentration.
Fear is data, not failure
Every practitioner I’ve watched learn this pose tips over more times than they land it. That’s normal. Treat each wobble as information about where your weight or gaze went wrong, not evidence you can’t do it. Progressive exposure, using a block, a wall, then nothing, is how fear quietly disappears.
Which Props Actually Help You Learn Crane Pose?
A stable, non-slip mat matters more in Bakasana than almost any other pose, since a hand that slides an inch mid-lift will end your attempt instantly. Pair that with a low-density support block to shorten your first lifts, a padded wrist wedge if your wrists complain during warm-ups, and a yoga strap for the hip-compression drills that build the muscle memory for hugging your knees against your arms.
Yuneyoga’s natural rubber and eco-friendly foldable mats give you the grip you need for both hands to stay planted through the entire weight shift, without the sliding that ruins confidence early in training. If your wrists are sensitive, choosing a slightly thicker mat, or folding a thinner one, cuts the extension angle at your wrist joint during every practice session, an important detail while you’re still building tolerance. Our Bala Yoga Mat breaks down exactly how grip and stability interact for balance work like this. Browse the full mat and prop collection to find the block, strap, and mat combination that fits your current stage of practice, and start your next session with gear that won’t let you down mid-lift.
Frequently Asked Questions
Is Crane Pose the same as Crow Pose? Not exactly. Kakasana (Crow) traditionally uses bent elbows, while Bakasana (Crane) uses straighter arms, which shifts more load onto your shoulders and wrists. Many studios use the names interchangeably, but the elbow angle is the real distinguishing feature.
What muscles should I strengthen before attempting Crane Pose? Prioritize your transverse abdominis, obliques, hip flexors, and serratus anterior. Wrist strength and mobility matter just as much as core power, since your wrists bear significant load throughout the hold.
How long should I hold Crane Pose? Five to eight breaths is a solid intermediate target. Beginners should focus on consistency over duration, holding for even two or three breaths repeatedly before chasing longer times.
Can beginners practice Crane Pose safely? Yes, with modifications. Use a block under your feet, keep your knees on your triceps rather than reaching for your armpits, and practice near a wall until your balance feels reliable.
What should I do if I have wrist pain during Crane Pose? Stop immediately if you feel any sharp or pinching sensation. Warm your wrists thoroughly before attempting the pose, and avoid full weight bearing entirely if you have a recent wrist, elbow, or shoulder injury.