
Unlock Your Suppleness: Essential Yoga Poses for Flexibility Beginners
Feeling a bit stiff lately? Like your body isn't quite moving the way it used to? It happens to the best of us. Yoga is a really great way to help with that. It's not just about bending yourself into a pretzel; it's about helping your body feel better and move more freely. If you're new to this, don't worry. We're going to look at some simple yoga poses for flexibility beginners that can make a real difference. These are the yoga poses for flexibility beginners that will get you started on feeling more open and comfortable in your own skin.
Key Takeaways
- Start with basic yoga poses for flexibility beginners to build a solid foundation.
- Focus on consistent practice, even short sessions, rather than pushing too hard.
- Listen to your body; gentle stretching is more effective than forcing yourself into poses.
- Using your breath can help you relax into stretches and deepen your flexibility.
- Regular practice of these yoga poses for flexibility beginners will gradually improve your range of motion and overall comfort.
Foundational Poses For A Supple Body
Starting your yoga journey is all about building a solid base, and these initial poses are your stepping stones to a more flexible body. They might seem simple, but they do a lot to get your muscles and joints ready for deeper work. Think of them as the warm-up for your whole practice.
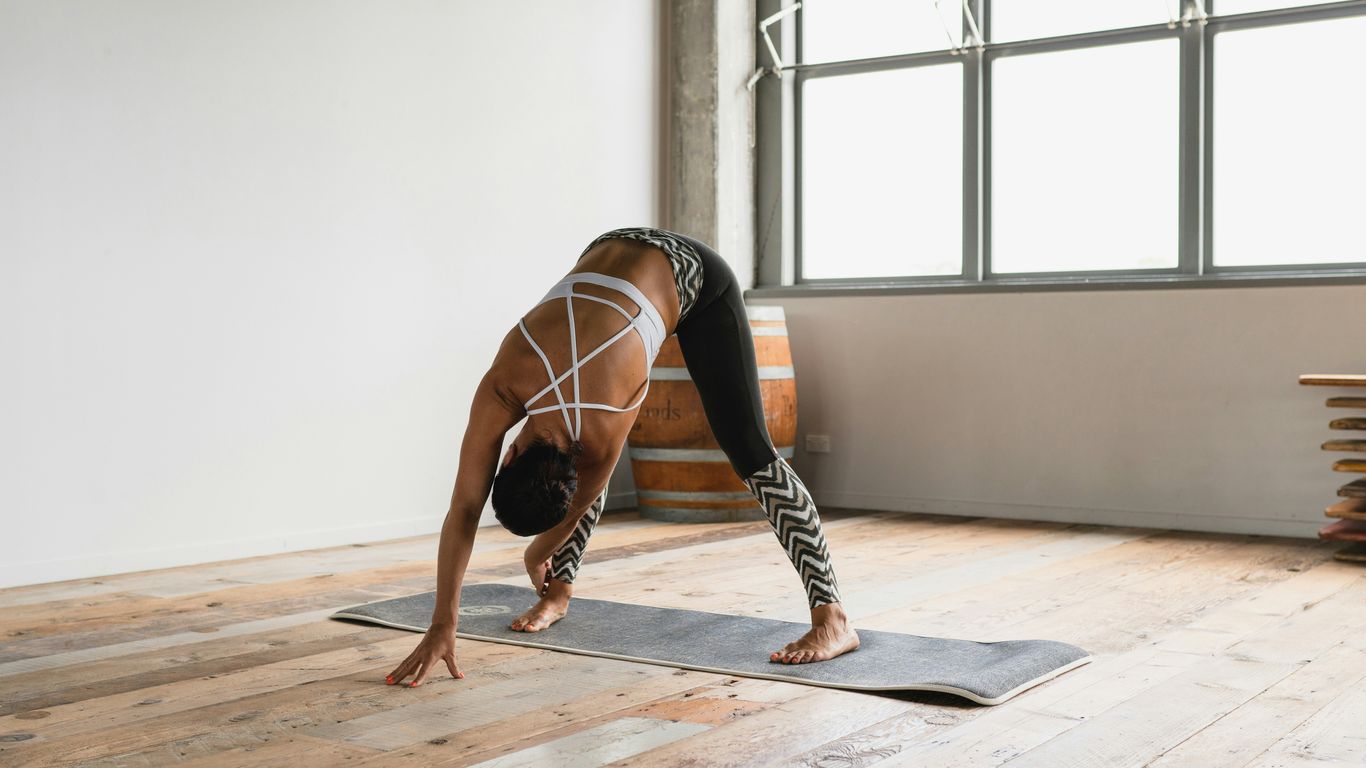
Embracing Downward Facing Dog
This pose is a real workhorse. It stretches out the back of your body, from your heels all the way up your spine, and it also gives your shoulders a nice opening. When you first try it, don't worry if your heels don't touch the floor or your legs are bent. The main thing is to get a long, straight line from your hands to your hips.
Here’s a quick rundown on how to get into it:
- Start on your hands and knees, with your wrists directly under your shoulders and your knees under your hips.
- Tuck your toes under and then lift your hips up and back, making an upside-down V shape with your body.
- Press down through your palms, spreading your fingers wide. Try to lengthen your spine.
- Let your head hang loosely between your arms. You can keep a slight bend in your knees if your hamstrings feel tight.
Hold this pose for at least five breaths, really focusing on the stretch. It's a great way to build strength in your arms and legs while improving flexibility. You can find more details on beginner yoga poses that include this one.
Gentle Cobra Pose For Spinal Extension
Cobra pose is fantastic for waking up your spine. It’s a gentle backbend that helps counter all the slouching we do throughout the day. It opens up your chest and shoulders, making it easier to breathe deeply.
To do a gentle Cobra:
- Lie on your stomach with your legs extended and the tops of your feet on the floor.
- Place your hands flat on the mat, directly under your shoulders, with your elbows tucked in close to your body.
- On an inhale, gently press into your hands and lift your chest off the floor. Keep your hips and pubic bone pressing down.
- Only lift as high as feels comfortable for your lower back. Avoid crunching your neck; keep your gaze slightly forward and down.
This pose is excellent for improving posture and creating a sense of openness. It’s a good way to start feeling more mobile in your back.
Child's Pose For Restorative Ease
After a bit of stretching, Child's Pose is your go-to for a moment of rest and calm. It’s a resting pose that gently stretches your back, hips, and thighs. It’s also a great way to reconnect with your breath and find a sense of peace.
To get into Child's Pose:
- Kneel on the floor. You can bring your big toes to touch and widen your knees apart, or keep them closer together.
- Exhale and fold your torso forward, resting your forehead on the mat.
- Extend your arms forward, or bring them back alongside your body with your palms facing up.
This pose is a safe space to land. It encourages you to slow down and simply be present. Don't push yourself; just allow your body to relax into the shape. It's a reminder that rest is just as important as movement in your practice.
These three poses are a wonderful starting point for anyone looking to increase their flexibility. They are accessible and offer significant benefits for beginners. You can explore a variety of yoga postures that build upon these foundations.
Unlocking Hip And Hamstring Flexibility
Our hips and hamstrings can get pretty tight, especially if we sit a lot. This section is all about giving those areas some much-needed attention. When these muscles are tight, it can affect your whole body, making it harder to move freely and even leading to discomfort. We'll look at a few poses that are really good for loosening things up.
Seated Forward Bend For Deeper Stretches
This pose is a classic for a reason. It really targets the back of your legs, your hamstrings, and also gives your spine a nice stretch. To do it, sit on the floor with your legs stretched out in front of you. Take a deep breath in, making your back long. Then, as you breathe out, gently fold forward from your hips, reaching towards your feet. Try to keep your back as straight as you can. It’s okay if you can’t touch your toes; just go as far as feels comfortable. Holding this pose for a minute or two can really help release tension.
Butterfly Pose For Inner Thigh Opening
Butterfly pose is fantastic for opening up the hips and stretching the inner thighs. Sit on the floor and bring the soles of your feet together, letting your knees fall out to the sides. You can hold onto your feet with your hands. Gently try to press your knees a little closer to the floor, but don't force it. Keep your back straight. This pose is great for releasing tightness in the groin area and can feel really good after a long day. It's a gentle way to work on hip opening yoga poses.
Pigeon Pose For Hip Flexor Release
Pigeon pose is a bit more intense but incredibly effective for releasing tension in the hip flexors and glutes. Start on your hands and knees. Bring your right knee forward towards your right wrist, and then extend your left leg straight back. Your right shin can be parallel to the front of your mat, or angled slightly if that’s more comfortable. Keep your hips square to the front. You should feel a stretch in your right hip. You can stay upright or fold forward over your front leg for a deeper stretch. Remember to breathe deeply throughout the pose. It's important to listen to your body here; if it feels too intense, you can modify it or try a gentler version like the Figure Four stretch. This pose is one of the most effective hip-opening stretches like Child's pose.
Here’s a quick rundown of how to approach these poses:
- Seated Forward Bend: Focus on lengthening the spine on the inhale and folding deeper on the exhale. Avoid rounding your back too much.
- Butterfly Pose: Allow gravity to do most of the work. Relax into the stretch rather than pushing.
- Pigeon Pose: Keep your hips as level as possible. If you feel any sharp pain, back off immediately.
Working on hip and hamstring flexibility isn't just about being able to do fancy poses. It's about making everyday movements easier and reducing the chance of aches and pains. Be patient with yourself; progress happens over time with consistent effort.
Standing Poses To Enhance Mobility
Standing poses are fantastic for building a solid base and getting your whole body moving. They really help connect you to the ground while also encouraging a sense of openness and length. Think of them as the sturdy pillars of your yoga practice, giving you stability so you can explore deeper stretches.
Warrior Series For Strength And Stretch
The Warrior series, including Warrior I, II, and III, are dynamic poses that do wonders for your legs, hips, and shoulders. They challenge your balance and build strength, but they also give you a good stretch. It’s a great way to work on stamina and overall mobility. These poses help improve the range of motion in your hips, which is super important for everyday movement. Plus, they really help you feel strong and grounded.
Triangle Pose For Full Body Lengthening
Triangle Pose, or Trikonasana, is a wonderful pose for stretching out the sides of your body. It really gets into your hamstrings, calves, and your spine. You'll also feel a nice opening in your chest and shoulders, which can help with your posture. It’s a pose that makes you feel long and expansive from your fingertips to your toes. It’s a great way to work on flexibility in your legs and torso. You can find a good starting point for many standing yoga poses in Mountain Pose (Tadasana) [6b88].
Here’s a quick breakdown of how to approach Triangle Pose:
- Start standing with your feet about three to four feet apart.
- Turn your right foot out 90 degrees and your left foot in slightly.
- Inhale and reach your arms out to the sides.
- Exhale and hinge at your hips, reaching your right hand forward and then down towards your shin, ankle, or the floor. Your left arm reaches straight up towards the ceiling.
- Keep both legs straight but not locked, and focus on lengthening your spine.
- Hold for a few breaths, then switch sides.
Remember, the goal isn't to touch the floor. It's about creating length and space in your body. Listen to what your body is telling you and don't push too hard. Using a yoga block under your hand can be a great way to bring the floor closer if needed.
Seated Poses For Grounded Flexibility
Sitting down to practice yoga might not seem as dynamic as standing poses, but these grounded positions are incredibly effective for building flexibility, especially in your hamstrings and hips. They offer a chance to really settle in and feel the stretch without worrying too much about balance. It’s a great way to connect with your body and find a sense of calm.
Head-To-Knee Pose For Hamstring Ease
This pose, known as Janu Sirsasana, is a fantastic way to work on those tight hamstrings and lengthen your spine. It's pretty straightforward: you sit with one leg extended and the other bent, bringing the sole of your foot to your inner thigh. Then, you hinge forward from your hips towards your extended leg. Don't worry if you can't touch your toes; the goal is to keep your back relatively straight and feel a gentle pull along the back of your leg. It's also good for digestion and can help quiet a busy mind.
- Preparation: Sit with legs extended, then bend one knee, placing the sole of your foot against your inner thigh.
- The Fold: Inhale to lengthen your spine, then exhale as you fold forward over your extended leg.
- Hold: Aim for 1-2 minutes, breathing deeply, then switch sides.
Easy Pose For Hip Opening
Easy Pose, or Sukhasana, is exactly what it sounds like – a simple, comfortable seated position. While it might seem basic, it's a wonderful starting point for opening up your hips. Just sit cross-legged, stacking your knees over your ankles if possible. You can sit on a cushion or a folded blanket to help lift your hips, which makes it easier to keep your spine upright and your hips more open. This pose is all about finding a stable and comfortable seat from which to breathe and relax. It's a pose you can return to again and again, whether you're meditating or just taking a moment to stretch.
Seated poses allow you to really feel the connection to the earth. They encourage a sense of stability and grounding, which can be really helpful when you're working on deeper stretches. It's less about pushing and more about allowing your body to open up gradually.
Here's a quick look at how to get into it:
- Sit on your mat or a cushion.
- Cross your legs comfortably, letting your knees fall outwards.
- Rest your hands on your knees or in your lap.
- Sit tall, lengthening your spine.
- Breathe deeply for a few minutes.
Supine Poses For Relaxed Stretching
After a good stretch, sometimes you just want to lie down and let gravity do the work. That's where supine poses come in. These are poses you do while lying on your back, and they're fantastic for winding down and giving your body a gentle release. They're super accessible, even if you're just starting out with yoga.
Reclined Butterfly Pose For Hip Relaxation
This pose, also known as Supta Baddha Konasana, is like a gentle hug for your hips. You lie on your back, bring the soles of your feet together, and let your knees fall open to the sides. It's a nice way to open up the inner thighs and groin area without much effort. You can even place blocks or cushions under your knees for extra support if needed. It's a great way to encourage blood flow to the hips and groin.
Happy Baby Pose For Lower Back Release
Don't let the name fool you; Happy Baby Pose (Ananda Balasana) is pure bliss for your lower back and hips. Lie on your back, bend your knees towards your chest, and grab the outsides of your feet. Then, gently pull your knees down towards your armpits, keeping your lower back pressed into the mat. It feels really good, especially if you've been sitting for a long time. It helps to release tension that builds up in the lower back and hips.
Legs-Up-The-Wall Pose For Restorative Calm
This pose, Viparita Karani, is incredibly simple but has big benefits. You simply lie on your back and extend your legs straight up against a wall. Your hips can be a few inches away from the wall, whatever feels comfortable. This pose is amazing for calming the nervous system, reducing fatigue, and promoting a sense of peace. It's a perfect way to end a yoga session or anytime you need a moment of quiet. Many beginners find this pose particularly helpful for relaxation after a workout. This resource introduces beginners to supine yoga poses.
Lying down to stretch might seem too easy, but these supine poses are powerful. They allow your muscles to relax and lengthen with the help of gravity, making them ideal for recovery and deep relaxation. Don't underestimate the power of simply lying down and breathing.
Cultivating A Consistent Flexibility Practice
So, you've been working through some great yoga poses to get more flexible. That's awesome! But here's the thing: just doing a few stretches here and there isn't going to make a huge difference long-term. To really see changes and keep your body feeling good, you need to be consistent. It's like anything else you want to get better at, right? You wouldn't expect to become a great cook by only making dinner once a month.
Setting Achievable Goals
When you're starting out, it's easy to get discouraged if you're aiming too high. Instead of thinking "I want to do a split by next week," try something more manageable. Maybe your goal is to hold a pose for 30 seconds longer than you did last week, or to simply practice three times a week. Small, consistent wins build momentum. It's all about making progress, not perfection. You can even start with a simple 5-minute routine designed for absolute beginners. It's a great way to ease into things.
Here’s a way to think about setting goals:
- Short-term: Focus on improving your form in a specific pose over the next week.
- Mid-term: Aim to increase the duration you hold stretches by a certain amount within a month.
- Long-term: Set a goal to comfortably practice a sequence of poses you find challenging now.
Listening To Your Body
This is super important. Your body will tell you what it needs, but you have to pay attention. Sometimes you'll feel a good stretch, and other times you'll feel a sharp pain. That's your cue to back off. Pushing too hard can lead to injuries, which will set you back way more than taking it easy for a day or two. Remember, flexibility is a lifelong journey, not a race.
It's better to stay in a range of five out of 10 (for level of stretch) for longer, rather than to hold for shorter and blow past your tolerance. Building up your tolerance over time and being consistent will give your body time to adapt to the flexibility you are trying to grow into.
The Power Of Breathwork
Don't underestimate the breath! It's not just about getting air into your lungs. When you're stretching, deep, conscious breathing helps your muscles relax. This allows you to go a little deeper into the pose without forcing it. It also calms your mind, making the whole experience more enjoyable and less stressful. Try to sync your breath with your movements; inhale to prepare, exhale to deepen the stretch. It really makes a difference in how you feel during and after your practice. Understanding the optimal frequency for stretching and the ideal duration to hold each stretch can also help you get the most out of your practice.
Keep Moving Forward
So, that's a look at some basic yoga poses that can really help you start feeling more flexible. Remember, getting more bendy doesn't happen overnight. It takes time and showing up on your mat, even if it's just for a few minutes. Don't get discouraged if you can't do everything perfectly right away. Just keep breathing, keep moving, and listen to your body. You'll be surprised at how much progress you make over time. Stick with it, and you'll definitely feel the difference.
Frequently Asked Questions
How often should I do yoga for flexibility?
For best results, try to practice yoga a few times a week. Even short, regular sessions are more helpful than one long session every once in a while. Consistency is key to becoming more flexible over time.
What if I can't touch my toes in a forward bend?
Don't worry if you can't touch your toes! It's totally normal when you're starting. Focus on keeping your back as straight as you can and bending from your hips. You'll get closer with practice. Using a strap can help too.
Is yoga better than regular stretching?
Yoga is great because it doesn't just stretch your muscles; it also builds strength and helps you relax. It works your whole body at once and connects your mind and body, which can lead to better flexibility and overall well-being compared to just stretching one muscle group.
Do I need special equipment to start yoga for flexibility?
Nope, you don't need much to begin! A comfortable mat is helpful, but you can even start on a carpeted floor. Things like yoga blocks or straps can help you get into poses safely, but they aren't required when you're just starting out.
How long does it take to see flexibility improvements?
Everyone's body is different, so it takes time. Be patient with yourself! You'll start to notice small changes in how easily you can move after a few weeks of consistent practice. Celebrate those little wins along the way!
What's the most important thing to remember when doing yoga for flexibility?
The most important thing is to listen to your body. Never push yourself into pain. Yoga should feel like a gentle stretch, not a strain. Breathe deeply and relax into the poses. Your body will tell you what it needs.

